Today's Quote + Stephen Covey Quote Freebies

I am a *BIG* fan of quotes- I think that is one of my most favorite Pinterest topics right after Education & Fashion. Anytime during the day when I am feeling stressed, I hop on the Quotes page and read through a few to get re-centered.... they are wonderful :)

I began noticing a few weeks back that my lovely thirdsters were starting to get early summer fever. We subsequently got over a foot of snow (blah!), but I introduced my most favorite quote to them at that time and they seemed to love it almost as much as I did. It's from Stephen Covey, of 7 Habits fame, and is just sosososo powerful:

Sigh.... isn't that just wonderful?! It has helped me redirect certain behaviors I have seen by simply asking, "Are you being a model or a critic?"

Of course, although I would love to keep this up all day, every day, I do switch it up about every week or so using some other wonderful resources.

My most favorite go-to is Shannon over at Technology Rocks.Seriously and Sweet Blessings. I *know* you have seen her amazing work all over Pinterest and beyond, and her posters are colorful, simple, powerful and free! Be sure to check out both of her blogs and her Printables page for some wonderful inspiration.

We hang these quotes below our calendar and schedule so they are easy to see and are very visible:


It's something I can then reference during Morning Meeting or any of our 7 Habits work. I have really liked this simple new addition to our room!


If you're interested in the "Today's Quote" sign, click HERE.
If you're interested in the Stephen Covey quote, click HERE.


Another fun site I've just recently found is Doodle Art Alley. They have loads of coloring quotes covering all topics! These are a great  activity for early finishers during Ketchup & Pickle Time and are not too young for my thirdsters, which is a win!


Do you use quotes in your class? What are some of your favorites?


Updated Animal Research Reports + Wilderness Walk

We study Colorado Animals every year and it is so much fun for kids to delve deeper into the animals we see in our area.


I posted about our Publishing Party last year, and this year we did it a bit differently. This was mostly due to the fact that we are running out of time and we have different standards to address this year as our district moves towards Common Core... never a dull moment!

I wanted to first teach kids how to organize notes into specific categories. We began by assembling our "Note Card Rings" that consisted of five note cards  each a different color, hole-punched in the corner with a binder ring connecting them:


On the top of each card, we wrote the topic for that card and a guiding question. Here's how I split it up this year:

- Habitat: Where to they live?
- Diet: What do they eat?
- Description: What do they look like?
- Predators/Prey: What do they hunt? What hunts them?
- Interesting Facts

Of course, you could easily adjust and/or add to these. I liked the Predator/Prey card this year because it tied in nicely with the Science Penguin's Food Webs Unit we were studying in Science Weekly 5 and it added a bit of humor when they realized they were another classmate's predator or prey :)

As they researched, this Note Card Ring could be added to with additional cards, if needed, and was easily transportable around the classroom, computer lab, and while meeting with me.

Final Presentation

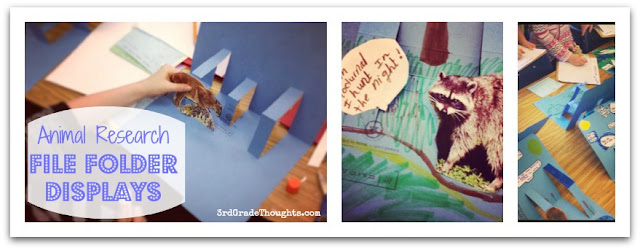
We did not do a written report this year, and I needed something engaging, easy, and informative for kids to display what they learned. I landed on File Folder Displays. Here's a quick how-to:


I had each student print out a picture of their animal and glue to one of the open tabs:


They then had the rest of that class time to add details about their habitat, diet, and/or predators and prey. I had them just use white paper and their own artistic-ness to make the details and they did beautifully :)

The next work time, we then looked through our Note Card Ring and chose two facts per card that were the most interesting. These were to be added onto their File Folder Displays in the form of a label, caption, or speech bubble from their animal or other animals that they added (predator/prey/etc.):


This was the part I *loved* the most because the kids' quotes were hilarious!! It was wonderful seeing them combine facts but add their personality into their pieces.

I should take this time to mention that (as usual), we had a rubric we had developed as a class as we went through each step of the process. I used a similar rubric to last year's, but obviously had to change a few things around. Here's this year's copy:


Wilderness Walk

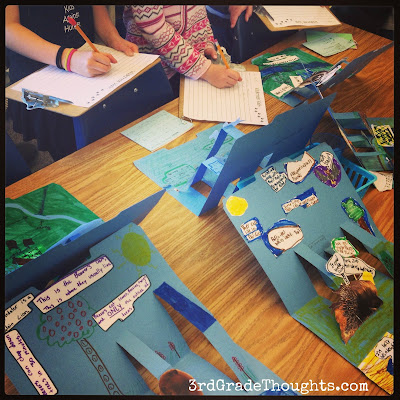
At the end of all of this hard work, we had a "Wilderness Walk" where we could go around and see each other's File Folder Displays and learn all about their animal. I gave each student a sheet with the list of animals on it with directions to write one thing you learned about each animal. Because I had two students (sometimes three) working on each animal, this gave them a chance to take notes on some, but not all, of the projects so they didn't feel too overwhelmed.

On their tables, students opened up their file folders and placed their note cards near them, in case students wanted to do some additional reading ;) They then walked around collecting facts about other animals. The Wilderness Walk was a huge success!


Here's a finished example of one student's Wilderness Walk sheet:


Overall, I loved this simple way to display what they had learned and I definitely think I will be using this File Folder Display again in the future-- it was too easy and the final products were too cute to pass up!

If you are interested in any of the rubrics and the Wilderness Walk sheet I used, I have added it to my Animal Research Report packet that is a FREEBIE on Google Docs.

Have you ever used a File Folder Display for a project? I would love to hear your ideas-- I think there are at least a million other uses :)


Revising: Writing Stronger Introductions & Conclusions + Freebies

I wanted to share some of the revising strategies we worked on earlier as a class to make writing pieces even stronger.

Students have used our ARMS Anchor Chart to work on the middles of their stories-- changing old, dead words to more descriptive, sensory words and taking out or moving parts that don't fit-- but now we're on to how we can make our introductions and conclusions the best they can be.


I have loved using my Story Starter Doodles for our "Hooking the Reader" Anchor Chart and the work that comes from the kids on the accompanying worksheet was enough to convince me to work on something similar for conclusions.
Click the picture to get this FREE download from my TpT Store
Here's a picture I snapped of a girl in my class hard at work:


I found a beautiful anchor chart (actually, this site has TONS of beautiful anchor charts!) that captured some of the best ways to end a piece of writing. I used most of them in my packet and included the little doodle guys doing something similar to what the strategy is.
Click the picture to get this FREE download from my TpT Store
Each of these little doodles comes in a larger size as well for you to make an anchor chart for your classroom, just like the Introduction chart HERE.

I had the kids choose three strategies from both of the pages to try out (we worked on intros one week and conclusions the next). After they had tried out three, they picked the best one to use as their intro and either removed their old sentence or revised it a bit to fit.

I will tell you, as a teacher, it was much more interesting to read their pieces after this activity-- so it doesn't just help your littles become better writers, it helps you maintain your sanity as you grade 20-30 of them ;)

If you're interested in either of these packets, they are available for FREE in my TpT Store. The introduction doodle packet can be found HERE and the *new* conclusion doodle packet can be found HERE.

Do you have any other strategies for ending a piece of writing in an interesting way?


Tracking Accelerated Reader Goals in Class + Freebies

We use Accelerated Reader in our class and it's a great way for kids to work toward a goal and for me to check their comprehension (surface level, at least!) of their Read to Self books.

I have tried two different systems and wanted to share both with you. They are great on their own, or you can use them together. The key is that each student has their own point goal and work to get to 100% or more of that goal. I {love} this system because my strugglers and my advanced readers have more of a level playing field to hit 100%, since their goals are tailored to their personal reading levels.

Keep reading to see how you can get this packet *free*

I know there are goods and bads to the program, but for me, it has worked out beautifully, and not just with my stellar readers. AR has also helped to motivate some of my more reluctant readers during Read to Self time if they know there is a goal they are working towards.

Goal Tracker #1: Class Goal Tracker


This is what we used the majority of the year and I loved it. Again, because each student had their own personal goal, they moved along the chart at a somewhat equal pace (as long as they were keeping up with quizzes).

Our school mascot is the dolphin (odd, since we are landlocked!) and I had the kiddos write their names on a die-cut piece of construction paper at the beginning of the year (I blurred them out for this blog picture). As they hit a milestone, they move their dolphin to the next section. The different circles read:

  • Getting Started 0%-25%
  • On Your Way 26%-50%
  • Half Way There 51%-75%
  • Almost There 76%-99%
  • You Did It! 100%+

This bulletin board is near our classroom computers and it was easy for kids to move their dolphin & push pin after I checked their TOPS Report to see their progress.

I ran into a problem, though, since this is just one of two bulletin boards in our class and I really, really, really needed the space for other things. So, I had to come up with a new system....

Goal Tracker #2: Personal Bookmarks

These are working perfectly so far! On the back side is their name and on this side is all of the necessary info at their fingertips! Now, instead of moving their dolphin, they come to see me and I put a sticker on the star of the milestone they most recently passed. You could also have them color it in, or you could use a hole punch.

The bookmark holds their point goal as well as the levels they feel are "Just Right". I still have my class library leveled in GRL, so I have them put down letters, but you could easily use the ATOS Level numbers used by AR-- up to you!

How do I determine a student's point goal?

Our school is fortunate to also have the STAR Reading Test, that aligns perfectly with AR Goals. If your school doesn't have the STAR option with AR, no problem!

AR has a site that is *free* and requires only a student's Grade Level Equivalent Reading Level (GL). After entering that info, along with the daily reading time, they will give you ZPD (Zone of Proximal Development) levels and the student's goal. Find their Goal Calculator here: http://argoals.renlearn.com/

How do you find your student's Grade Level Equivalent Reading Level? Great question, and it really depends on what leveling system you are using in your classroom-- I think there's probably 7,000 different leveling systems, right!? Eeek!

There are some very helpful correlation charts out there (HERE is one that has a lot!), and I would recommend Googling your leveling system and seeing if there is ATOS or Grade Level as an option.

You can also determine a child's GL by using a Just Right book they have been reading and plugging it into the AR Book Finder found HERE. This is the bank of all of the AR Quizzes and nearly every book on the planet is found in there :)

If you're interested in either of these goal trackers, I have them available for *FREE* by heading to Google Docs HERE. This packet contains a customization option for the bookmarks-- you can type in your students' names and print them front-back on cardstock to get them started in class as soon as possible!


Please Note: *AR and Accelerated Reader are registered trademarks of Renaissance Learning, Inc.

How do you track AR Goals in your class? Do you have any helpful tips? Please share below-- I'd love to hear/see what you use :)


Labeling Plastic Drawers/Bins/Shelves the Easy Way!

I am in {LOVE} with my new drawers for centers. There are 12 drawers in a set and they get great use as our Math, Word Work, and iPad Center holders.

One thing I wanted to make sure of was having easy-to-read labels that could be changed often, as our centers will change and *if you know me* I change my mind a lot when it comes to organizing my classroom :) This tip works well on any plastic or laminate surface.

My solution: Post-It Notes & Book Tape


Have you ever heard of Scotch Book Tape? It definitely costs more than cheap-o clear packing tape, but I reserve it for specials projects like this and I find it to last longer, hold up very well, and be the best permanent temporary adhesive (does that even make sense?).

Here's a link on Amazon, in case you can't find it in your office bog box store:


I also love printing on sticky notes. Kristen at Ladybug's Teacher Files has not only a very helpful tutorial HERE, but the PowerPoint template I used to make these lovelies.... she's awesome.

I used Super Sticky Post-Its for this project only because I loved the color (tee hee!) and my font is "My Own Topher" from Kevin & Amanda.

Here's a picture of the labeling in progress:


And, the completed look:


I simply trimmed the sticky note, stuck it to the drawer, and secured it on top with a piece of Book Tape. Now, switching these labels (or even re-positioning a crooked one!) is easy-peasy on both the drawers and my patience! The book tape is durable, transparent, and comes off easily when our centers change-- perfecto!

How do you label your drawers/shelves/bins that need changing throughout the year? Anybody else in love with Post-It Note printing?

Before I go, I wanted to let you know I have added Earth Day Fraction Fun to my TpT and TN Stores.


Some of my thirdsters are still struggling with equivalent fractions, so these activities are here to help. Inside, you will find 16 fraction cards that will be used for all three activities: Memory, Comparing, and a Secret Message sheet. Fun, quick, targeted, and timely :) Have fun with them!